- Easy
- about 30 min
How to Block and Stiffen Crochet (Ornaments and Snowflakes)
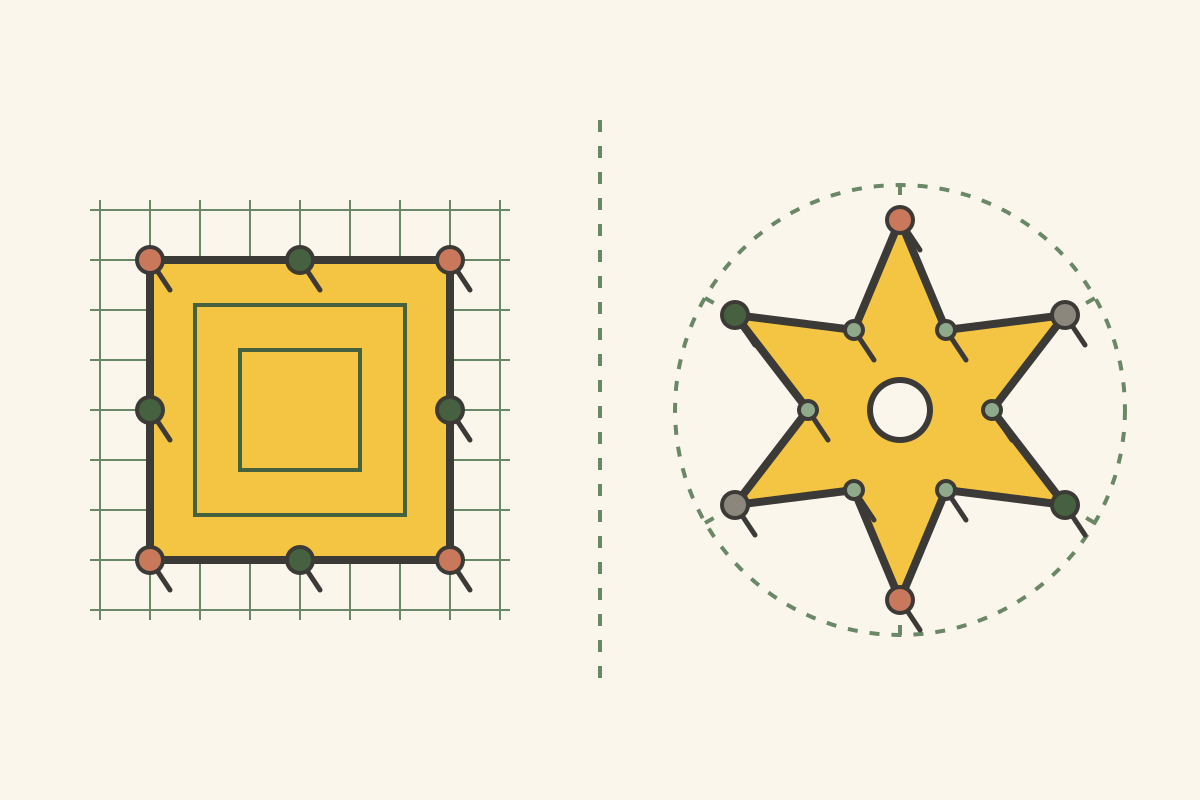
Blocking and stiffening are the last steps that turn a finished piece of crochet into a neat ornament. Blocking sets the shape: you wet or steam the piece, pin it out to the size and shape you want, and let it dry. Stiffening goes one step further: you soak the piece in a stiffener before pinning, so it dries firm and keeps its shape on the tree, year after year.
Most flat ornaments only need blocking. A lacy snowflake needs stiffening, because thin chain loops can’t hold a point on their own. Stuffed, three-dimensional ornaments get their shape from the stuffing and normally need neither.
You’ll need
- A blocking surface that pins go into: foam blocking mats, a cork board, or a folded towel on a piece of cardboard
- Rust-proof pins, such as stainless steel pins or T-pins (ordinary pins can rust and stain damp yarn)
- A towel for pressing out water
- For stiffening: a stiffener (see below), a small bowl, plastic wrap or a plastic bag to cover the board, and paper towels
- For snowflakes: a paper template (how to draw one is in the snowflake steps)
- Optional: a spray bottle, or a steam iron or garment steamer
Blocking and stiffening at a glance
| Blocking | Stiffening | |
|---|---|---|
| What you add | Water or steam | A stiffener: fabric stiffener, diluted white glue or starch |
| What it does | Relaxes the stitches, evens out the shape, opens up lace | Makes the piece firm, so points and edges stay where you pin them |
| How long it lasts | Until the piece is washed or gets wet again | Starch: until washed. Glue and most stiffeners: until soaked off on purpose |
| Feel afterwards | Soft, the same as the yarn | Firm, from slightly crisp to hard |
Which ornaments need what
- Snowflakes and other lacy motifs: stiffen. Without it, the points droop and the motif curls.
- Flat ornaments in solid stitches (granny square, flat tree, star): block. Stiffen only if you want crisp, rigid points or the piece is floppy.
- Rings and wreaths: a light block if the ring doesn’t lie flat. Stiffen only if it is floppy.
- Stuffed ornaments (balls, snowmen, hats): no blocking. Shape them while stuffing.
Check the fiber first
How a piece reacts depends on what the yarn is made of, so read the yarn label before you start.
- Cotton and wool respond well to water: they relax when wet and keep the pinned shape when dry. Cotton thread is the traditional choice for snowflakes because it takes stiffener evenly.
- Acrylic changes very little with water alone. Heat reshapes it, but too much heat (an iron touching it, or long, close steaming) relaxes it permanently and can melt it. Yarn makers disagree about steaming acrylic, so follow your label, and if you steam, test a swatch first.
- Metallic yarn and blends: follow the label and test a small piece before soaking it in a stiffener.
Blocking methods
Wet blocking
Soak the piece in cool or lukewarm water until it is wet through. Squeeze the water out gently without wringing or twisting. Roll the piece in a towel and press to remove more water, then pin it out and let it dry.
Good for: cotton and wool, and pieces that need a real change of shape, such as lace that should open up or a square that has gone slightly crooked.
Spray blocking
Pin the dry piece to shape first, then mist it with water until it is damp all over, and let it dry on the board.
Good for: small pieces and gentle corrections, and for yarns that shouldn’t be soaked. It changes the shape less than wet blocking.
Steam blocking
Pin the piece to shape. Hold a steam iron or garment steamer a few centimeters (about an inch) above it and let the steam pass through. Never press the iron onto the crochet. Keep moving, and let the piece cool and dry before unpinning.
Good for: wool, and acrylic where the label allows heat. It works fast. With acrylic, a little steam softens it; too much flattens it for good.
Stiffening methods
Commercial fabric stiffener
A ready-made liquid sold for craft and lace work. It is the simplest and most predictable option. Follow the label for dilution, soaking and drying, because products differ.
Good for: snowflakes, and anything you want firm with the least guesswork.
Diluted white glue
White PVA craft glue (the kind sold as school glue) mixed with water. Equal parts glue and water is a common starting point. More water gives a softer, more flexible result, and more glue a harder one. Mix well until there are no lumps. Test the mix on a swatch or a spare motif first. Choose a glue that dries clear and is washable (water-based). Don’t use glue sticks or strong adhesives.
Good for: snowflakes and other lace that should stay rigid for years. It is cheap and easy to find. Glue-stiffened pieces are not meant to be washed.
Starch
Spray starch, or liquid laundry starch, gives a light, crisp hold. It washes out, so you can re-starch after cleaning. Starch made from cornstarch at home can leave a whitish film, which shows on dark yarn.
Good for: a light hold, pieces you may want to wash, and white or pale thread.
Sugar water
Sugar syrup is a traditional stiffener and does make thread very stiff. But it softens in damp air, and it can attract insects. Use it only if you know the conditions where the ornament will be stored.
Prepare the board
- Cover the board or mat with plastic wrap or a plastic bag if you are stiffening, so the piece doesn’t stick to it.
- For a flat piece with straight sides, use the grid on a blocking mat, or put squared paper under the plastic, so you can line the edges up.
- For a snowflake, draw a template (see the snowflake steps) and put it under the plastic.
Step by step: blocking a flat ornament
This works for a granny square, a flat tree or a star.
- Weave in the ends first. A blocked piece holds the woven tails in place.
- Wet it. Soak the piece until it is wet through, or pin it dry if you are spray blocking.
- Remove the water. Squeeze gently, then roll it in a towel and press.
- Pin the main points first. For a square, pin the four corners so the sides are the same length and the corners are square to the grid. For a star, pin the five tips the same distance from the center.
- Pin the middles. Pin the middle of each side of the square, or the inner corner between two star points. Then add pins between them until the edges are straight and not scalloped. On a small ornament that is often every 1 to 2 cm (about ½ to ¾ in).
- Don’t overstretch. Ease the piece out until it lies flat at the size the pattern gives. Pulling hard distorts the stitches.
- Let it dry completely (see drying below), then remove the pins.
For crisper points, use the same steps but soak the piece in a stiffener instead of water at step 2. Then follow the stiffening notes in the snowflake steps.
Step by step: stiffening a snowflake
- Weave in the ends and trim them. Stiffened tails can’t be woven in later.
- Make a template. On paper, draw a circle the size you want the finished snowflake to be. Draw three straight lines through the center, 60° apart, so they divide the circle into six equal slices. You can use a protractor, or fold a paper circle in half and then into thirds. Put the template on the board and cover it with plastic wrap.
- Mix the stiffener in a small bowl, if it needs mixing.
- Soak the snowflake until it is saturated. Squeeze it in the liquid a few times so the stiffener gets into every stitch.
- Remove the excess. Squeeze gently, then blot between paper towels. The thread should be evenly wet, with no liquid film across the holes. If a film is left in a space, poke it open with a pin.
- Center it. Lay the snowflake on the template with its center over the center of the circle. Pin through the center ring if it moves.
- Pin opposite tips in pairs. Pin one point on a line at the edge of the circle, then the point directly opposite it. Repeat for the second and third pairs. Pinning opposite pairs keeps the snowflake from being pulled to one side.
- Pin the valleys. Put a pin in the valley between each pair of neighboring points, at the same distance from the center each time. Shape any loops along the arms and pin them open.
- Check it. Every point should sit on a line and touch the circle. Adjust any pins before the stiffener starts to set.
- Let it dry completely. Then remove the pins, and peel the snowflake off the plastic.
Hanging loop: keep a ribbon or thread loop out of the stiffener. Tie it on after the snowflake is dry.
Drying and shaping
- Dry flat, at room temperature, away from direct heat and sunlight. Good airflow, such as a fan in the room, speeds it up.
- Drying time depends on the yarn, the stiffener and the humidity. A small cotton piece may be dry in a few hours, but a soaked or stiffened piece often needs a day. Wait until it is dry all the way through, including the back. If you unpin too early, it springs back out of shape.
- With glue or stiffener, a pin can stick as it dries. Turn pins gently to free them instead of pulling hard.
- For a 3-D shape, such as a bell or a curved motif, dry the stiffened piece over a form covered in plastic wrap, such as a small bowl or a ball, instead of on a flat board.
Common mistakes
- Uneven snowflake points: pinned by eye. Use a template and pin opposite tips in pairs.
- Scalloped edges: too few pins. Add pins between the first ones until the edge is straight.
- Expecting acrylic to change with water: it hardly reacts. Use gentle steam if the label allows it, or a stiffener.
- Pressing an iron onto acrylic: it can flatten it permanently or melt it. Steam from above only.
- A film of stiffener in the holes, or a shiny, sticky finish: too much stiffener was left in. Blot more, and use a thinner mix next time.
- Stuck to the board: the board wasn’t covered with plastic.
- Rust spots: ordinary pins in damp yarn. Use stainless steel pins.
- Unpinning too soon: the piece relaxes back. Wait until it is completely dry.
- Ends woven in after stiffening: too hard to do once the piece is stiff. Weave and trim them first.
Washing and re-stiffening later
- Blocked only: wash it as the yarn label says, then block it again the same way.
- Starched: the starch washes out. Wash it, then starch and pin it again.
- Glue or commercial stiffener: not made for washing. Dust it with a soft, dry brush. If it is dirty or limp, check the stiffener’s label for removal. Water-based glue usually softens when soaked in warm water, and may need several soakings and rinses before it lets go. Then wash the piece, block it, and stiffen it again from step 3.
- Storing: keep ornaments flat in a box, between sheets of tissue paper, and somewhere dry. Damp softens starch and sugar, and crushing bends stiffened points.
FAQ
Do I have to block my ornament?
No, but it helps. Blocking evens out small differences in tension, so points match and edges are straight. Snowflakes are the exception: without blocking and stiffening they look like flowers rather than snowflakes.
Can I block acrylic yarn?
Yes, but water does little. Gentle steam held above the piece reshapes it, if the label allows heat. A stiffener also works on acrylic for ornaments.
Which stiffener is best for snowflakes?
For a firm snowflake that lasts, a commercial fabric stiffener or diluted white glue. For a lighter hold that you can wash out, starch.
How long does stiffening take to dry?
It varies with the yarn, the mix and the humidity. Plan on leaving it pinned overnight or for about a day, and check that the back is dry before unpinning.