- Easy
- 45 min
How to Crochet a Classic Granny Square (Free Pattern)
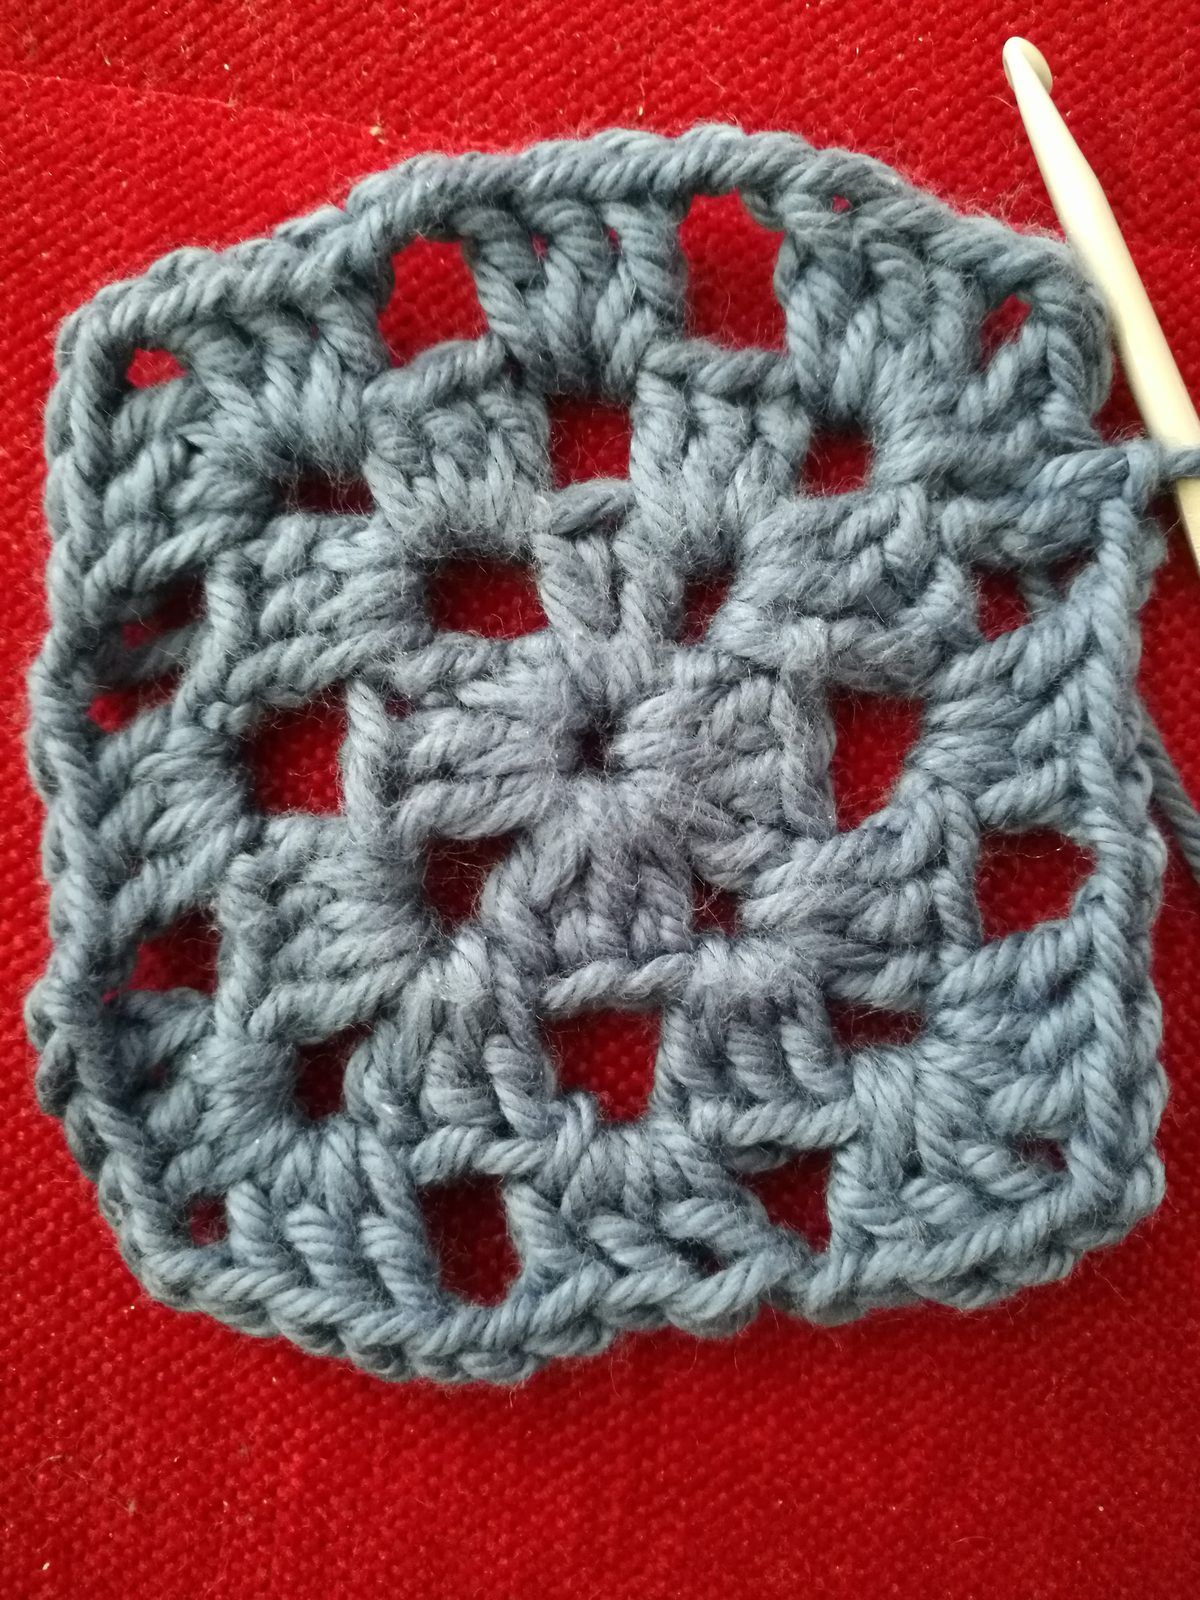
Learn how to crochet a classic granny square: a 4-round free pattern with 3-dc clusters, ch-2 corners and ch-1 sides, plus a stitch chart and counts.

- Skill
- Easy
- Finished size
- Not measured. The size after Round 4 depends on your yarn, hook and tension; measure your own square before planning a project.
- Gauge
- Not critical. Measure your square after Round 2 or Round 4 to see the size your yarn, hook and tension give.
Materials
- Worsted weight (medium, #4) yarn — Amount not measured: to find your own figure, weigh the yarn before and after making one square. Scraps in one to four colors work well.
- Crochet hook — 5 mm (US H-8), or the size that gives a fabric you like with your yarn.
- Yarn needle and scissors
Stitches used: chain (ch) · slip stitch (sl st) · double crochet (dc)
The granny square is the most famous motif in crochet, and for good reason: it uses only chains, slip stitches and double crochet, and once you’ve made one, you can make a blanket’s worth without looking at the pattern. This is the traditional version, with groups of three double crochet (“clusters”) worked into the spaces between groups, not into individual stitches.
US/UK note: This pattern uses US terms. US double crochet (dc) is UK treble crochet (tr); slip stitch (sl st) is written ss in UK patterns.
Which granny square is this?
There are many small variations. This one is the classic:
- Starts with a ch-4 ring (a magic ring also works).
- The beginning ch 3 counts as the first dc of each round.
- Corners: (3 dc, ch 2, 3 dc) in the corner space.
- Sides: clusters of 3 dc separated by ch 1.
- Each round starts by slip stitching across to the nearest corner, so the whole square can be worked in one color without fastening off.
Abbreviations
ch = chain · sl st = slip stitch · dc = double crochet (UK treble) · sp = space · st(s) = stitch(es) · rep = repeat · beg = beginning
Cluster = 3 dc worked into the same space.
Pattern
Foundation: Ch 4, sl st in the first ch to form a ring.
Round 1: Ch 3 (counts as dc), 2 dc in ring, ch 2, *3 dc in ring, ch 2; rep from * 2 more times. Sl st to top of beg ch-3. (12 dc: 4 clusters, 4 ch-2 corner sps)
Round 2: Sl st in next 2 dc and into the ch-2 sp. Ch 3 (counts as dc), (2 dc, ch 2, 3 dc) in same sp, ch 1, *(3 dc, ch 2, 3 dc) in next ch-2 sp, ch 1; rep from * 2 more times. Sl st to top of beg ch-3. (24 dc: 8 clusters, 4 ch-2 corners, 4 ch-1 sps)
Round 3: Sl st in next 2 dc and into the ch-2 sp. Ch 3, (2 dc, ch 2, 3 dc) in same sp, ch 1, 3 dc in next ch-1 sp, ch 1, *(3 dc, ch 2, 3 dc) in next ch-2 sp, ch 1, 3 dc in next ch-1 sp, ch 1; rep from * 2 more times. Sl st to top of beg ch-3. (36 dc: 12 clusters, 4 ch-2 corners, 8 ch-1 sps)
Round 4: Sl st in next 2 dc and into the ch-2 sp. Ch 3, (2 dc, ch 2, 3 dc) in same sp, ch 1, *(3 dc in next ch-1 sp, ch 1) twice**, (3 dc, ch 2, 3 dc) in next ch-2 sp, ch 1; rep from * 2 more times, then rep from * to ** once more. Sl st to top of beg ch-3. (48 dc: 16 clusters, 4 ch-2 corners, 12 ch-1 sps)
Fasten off and weave in the ends.
Counts at a glance
| Round | Clusters per side | Total clusters | Total dc | ch-1 sps |
|---|---|---|---|---|
| 1 | 1 | 4 | 12 | 0 |
| 2 | 2 | 8 | 24 | 4 |
| 3 | 3 | 12 | 36 | 8 |
| 4 | 4 | 16 | 48 | 12 |
The pattern continues the same way forever: every new round has one more cluster per side (the extra cluster comes from the corner splitting into two). Round n has 4n clusters and 12n dc.
Making a multicolor granny square
To change colors at each round, don’t slip stitch across. Instead:
- Fasten off the old color at the end of the round.
- Join the new color with a sl st in any ch-2 corner space.
- Ch 3 and work that corner as (2 dc, ch 2, 3 dc), then continue the round as written.
Starting each color in a different corner spreads the tails out, so they don’t all end up in one spot.
Tip: When you join a new color in a corner, crochet over the new color’s tail for the first cluster or two. It saves weaving later.
Stitch chart
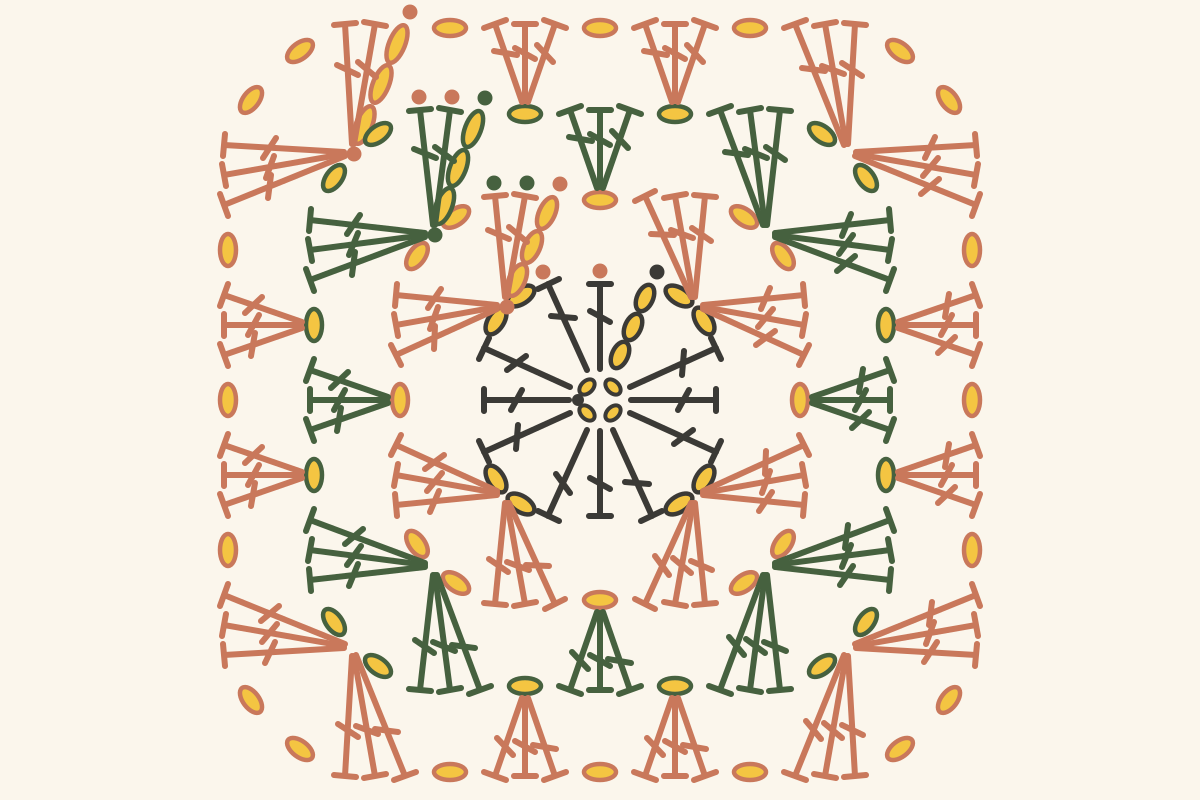
Chart key
- chain (ch)
- slip stitch (sl st) — UK: slip stitch (ss)
- double crochet (dc) — UK: treble crochet (tr)
Rounds are read counter-clockwise from the center, starting at each round’s beginning chain.
Reading the chart
The chart above shows all four rounds, viewed from the right side and read counterclockwise, the direction a right-handed crocheter works. Each round’s starting ch-3 is drawn as three stacked ovals, and the dots before it show the slip stitches that move you across to the corner. Left-handed crocheters work clockwise; the finished square looks the same.
Common mistakes
- Square twists: Squares worked in the same direction every round can rotate a little. Some crocheters turn the work over after each round to counter it, and blocking can help even out the shape.
- Corners that bunch or pop up: Check you have exactly ch 2 at corners and ch 1 on sides. Extra chains can make the edges flare.
- Lopsided square: One side has an extra or missing cluster. Count clusters per side using the table.
- Big gap at the start of the round: Make the ch-3 snug, or replace it with a standing double crochet.
- Working into stitches instead of spaces: Granny clusters go into the spaces (ch-1 or ch-2) of the previous round, not into the tops of the dc.
FAQ
Does the ch 3 count as a stitch?
Yes, in this pattern. The beginning ch 3 counts as the first dc of the first cluster, and you join each round by slip stitching into its top.
Can I use a magic ring instead of the ch-4 ring?
Yes. Work round 1 into a magic ring and pull the tail to close the center. Unlike the ch-4 ring, a magic ring can be pulled fully closed.
How do I make a bigger granny square?
Keep going. Each round adds one cluster per side. A large square for a blanket is simply this pattern worked for as many rounds as you like.
How many granny squares do I need for a blanket?
Divide the blanket width and length by your measured square size (after blocking), and round up. Always measure your own square; sizes vary with yarn and tension.
How much yarn does one granny square use?
It depends on your yarn, hook and tension, so measure it. Weigh your ball before you start, make one square, and weigh the ball again. The difference is the weight of yarn in one square. Multiply by the number of squares you need, add some extra for joining and the border, and use the yardage-per-weight on the yarn label to convert grams to yards or meters.
This page uses US crochet terms.