- Easy
- about 75 min
Crochet Snowman Ornament (One-Piece Amigurumi Pattern)
A free crochet snowman ornament worked in one piece: body and head are two stuffed single crochet balls joined by a decrease, with a chain scarf. No sewing.
- Skill
- Easy
- Finished size
- Approximately 3 in (7.5 cm) tall, with a body about 1.75 in (4.5 cm) across, in worsted yarn with a 3.5 mm hook. Size depends on yarn, hook and stuffing; these are estimates, not measurements.
- Gauge
- Not critical, but the fabric must be dense: if you can see stuffing between the stitches, go down a hook size.
Materials
- Worsted weight (medium, #4) yarn in white — About 10 yd (9 m). Estimated, not measured.
- Worsted weight yarn for the scarf — About 1 yd (1 m) in red, green or plaid colors.
- Crochet hook — 3.5 mm (US E-4), smaller than the label suggests, so the stuffing doesn't show.
- Fiberfill stuffing
- Stitch marker, yarn needle and scissors
- Ribbon or yarn for hanging — About 10 in (25 cm).
Stitches used: magic ring (MR) · single crochet (sc) · increase (2 stitches in one stitch) (inc) · single crochet two together (sc2tog) · chain (ch)
This snowman is made in one piece: a bigger ball for the body and a smaller one for the head, linked by a narrow neck. You stuff the body before the neck closes, carry on into the head, and finish with a chain scarf, so there is nothing to sew together. It is a good next step after a plain ball.
US/UK note: This pattern uses US terms. US single crochet (sc) is UK double crochet (dc), and sc2tog is UK dc2tog.
Abbreviations
MR = magic ring · ch = chain · sc = single crochet (UK double crochet) · inc = 2 sc in the same stitch · dec = invisible decrease (sc2tog through the front loops) · st(s) = stitch(es) · rep = repeat
Pattern notes
- Work in a continuous spiral: don’t join rounds, and move a stitch marker to the first stitch of each round.
- The snowman is worked from the bottom up: body first, then head.
- Stuff each ball while the opening is still wide. You can’t reach the body once the head is under way.
Pattern
Body and head
Round 1: Make a MR, 6 sc in ring. (6 sts)
Round 2: Inc in each st around. (12 sts)
Round 3: *Sc in next st, inc in next st; rep from * 5 more times. (18 sts)
Round 4: *Sc in next st, inc in next st, sc in next st; rep from * 5 more times. (24 sts)
Rounds 5–8: Sc in each st around. (24 sts)
Round 9: *Sc in next st, dec, sc in next st; rep from * 5 more times. (18 sts)
Round 10: *Sc in next st, dec; rep from * 5 more times. (12 sts)
Stuff the body firmly through the opening, pushing the fiberfill well into the bottom.
Round 11: *Sc in next st, inc in next st; rep from * 5 more times. (18 sts)
Rounds 12–14: Sc in each st around. (18 sts)
Round 15: *Sc in next st, dec; rep from * 5 more times. (12 sts)
Stuff the head firmly.
Round 16: (Dec) 6 times. (6 sts)
Fasten off, leaving an 8 in (20 cm) tail.
Scarf
With scarf yarn, ch 30. Fasten off. That’s the whole scarf: tie it around the neck (Round 10–11) and trim the ends.
Counts at a glance
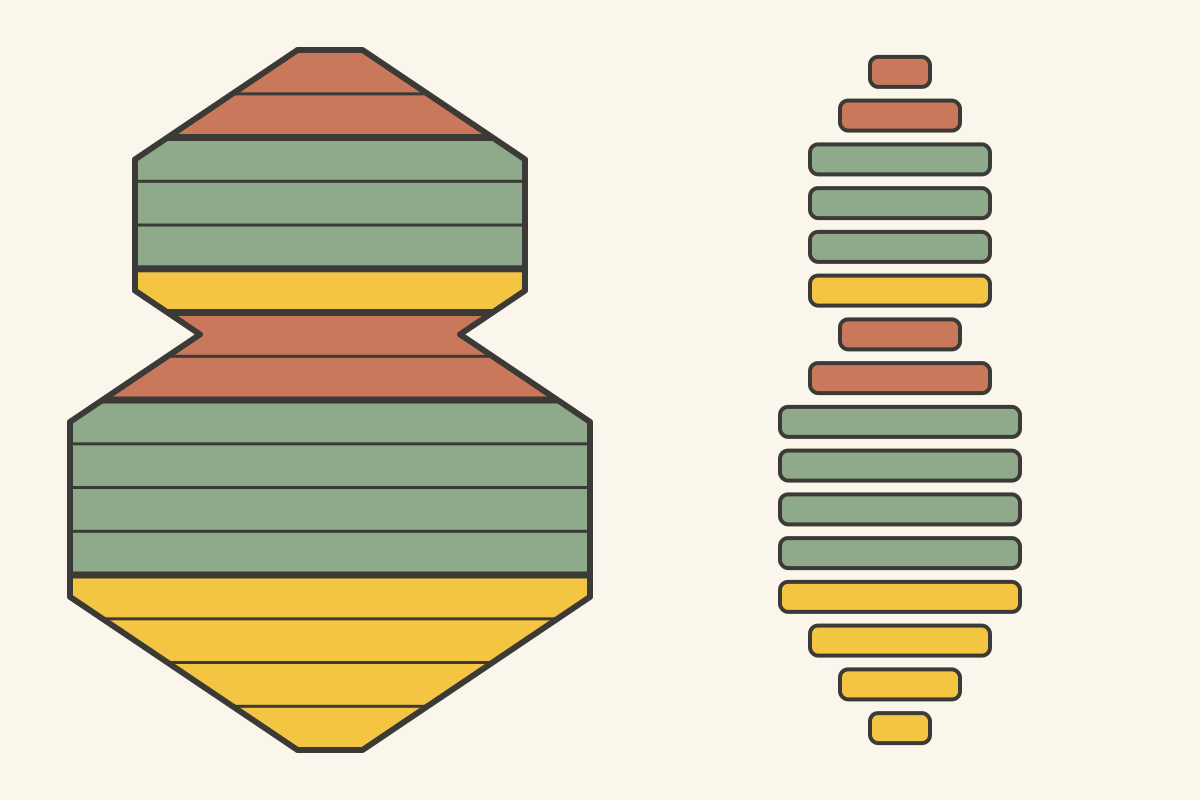
| Round | Instruction | Stitch count |
|---|---|---|
| 1 | 6 sc in MR | 6 |
| 2 | inc × 6 | 12 |
| 3 | (sc 1, inc) × 6 | 18 |
| 4 | (sc 1, inc, sc 1) × 6 | 24 |
| 5–8 | even | 24 |
| 9 | (sc 1, dec, sc 1) × 6 | 18 |
| 10 | (sc 1, dec) × 6 | 12 |
| 11 | (sc 1, inc) × 6 | 18 |
| 12–14 | even | 18 |
| 15 | (sc 1, dec) × 6 | 12 |
| 16 | dec × 6 | 6 |
Closing and finishing
- Thread the tail on a yarn needle and weave it through the front loop of each of the last 6 stitches.
- Pull tight to close the top of the head.
- Push the needle down through the head and out at the neck, pull slightly, and trim the tail so it disappears inside.
- Weave the magic ring tail into the body.
Hanging loop
Thread 10 in (25 cm) of ribbon or yarn on a yarn needle, pass it under a stitch at the very top of the head (Round 16) and tie the ends together.
Stitch chart
Common mistakes
- No visible neck: the body or head is under-stuffed, or Round 10 lost stitches. The neck is the narrow 12-stitch round between two firmly stuffed balls.
- Stuffing shows through: go down a hook size and keep your stitches tight.
- The head flops forward: stuff the neck area firmly too, so the head has something to sit on.
- Faceted balls: the increases or decreases are stacked. Follow the repeats exactly.
- The snowman leans: a spiral leans slightly. Hang it from the center of the head, not from one side.
Variations
- Size: for a bigger snowman, make the body to 30 stitches (add *sc in next 3 sts, inc in next st; rep from * 5 more times after Round 4), work 5 even rounds and decrease 30→24→18→12 before starting the head.
- Color: a cream or pale blue snowman looks soft and wintry. Make the scarf in two colors by tying two chains together.
- Face and buttons: most snowmen have a face. QuackStitch doesn’t teach embroidery or safety eyes yet, so this pattern leaves the face plain. If you know how, add eyes and a nose before you close the head.
FAQ
Can I add a hat?
A tiny version of our mini Santa hat works, but it has to be sewn on, and that isn’t covered here. Tying the hanging ribbon in a bow on top is a no-sew alternative.
Why does the head start with an increase round right after the neck?
Going straight from 12 back to 18 stitches makes a sharp waist, so the two balls look separate. A slower increase would make a pear shape instead.
How firmly should I stuff it?
Firmly enough that the balls are round and don’t dent when you press them, but not so hard that the stitches stretch apart.
This page uses US crochet terms.