- Easy
- about 50 min
Crochet Mini Santa Hat Ornament (Free Pattern)
A free crochet mini Santa hat ornament: a red single crochet cone worked from the tip down in a spiral, with a white brim. Exact counts for every round.
- Skill
- Easy
- Finished size
- Approximately 3.5 in (9 cm) tall and 2.5 in (6.5 cm) wide at the brim when laid flat, in worsted yarn. Size depends on yarn and tension; these are estimates, not measurements.
- Gauge
- Not critical. Tighter stitches make a stiffer cone that stands up better.
Materials
- Worsted weight (medium, #4) yarn in red (A) and white (B) — About 8 yd (7.5 m) of red and 3 yd (2.5 m) of white. Estimated, not measured. A fluffy white yarn of the same weight makes a nice brim.
- Crochet hook — 3.5 mm (US E-4) or 4 mm (US G-6).
- Stitch marker, yarn needle and scissors
- Ribbon or yarn for hanging — About 10 in (25 cm).
- Fiberfill stuffing (optional) — A pinch, if you want a rounded hat instead of a flat one.
Stitches used: magic ring (MR) · single crochet (sc) · increase (2 stitches in one stitch) (inc) · slip stitch (sl st)
A mini Santa hat is one of the cutest Christmas ornaments, and it is only a cone with a white brim. You work it from the tip down in a continuous spiral, adding three stitches every other round, so it grows slowly into a tall, slim hat. No sewing, no assembly: when the brim is done, so is the hat.
US/UK note: This pattern uses US terms. US single crochet (sc) is UK double crochet (dc).
Abbreviations
MR = magic ring · sc = single crochet (UK double crochet) · inc = 2 sc in the same stitch · sl st = slip stitch · st(s) = stitch(es) · rep = repeat
Pattern notes
- Work in a continuous spiral: don’t join rounds, and move a stitch marker to the first stitch of each round.
- Increases happen on even rounds only. Odd rounds (from Round 3) are plain.
- The increase sits at the end of the repeat on Rounds 4, 8 and 12, and in the middle on Rounds 6, 10 and 14, so the increases don’t line up into a spiral ridge.
- To change color, work the last stitch of the old color until two loops remain, then pull the new color through.
Pattern
With A:
Round 1: Make a MR, 4 sc in ring. Pull the tail to close. (4 sts)
Round 2: *Sc in next st, inc in next st; rep from * 1 more time. (6 sts)
Round 3: Sc in each st around. (6 sts)
Round 4: *Sc in next st, inc in next st; rep from * 2 more times. (9 sts)
Round 5: Sc in each st around. (9 sts)
Round 6: *Sc in next st, inc in next st, sc in next st; rep from * 2 more times. (12 sts)
Round 7: Sc in each st around. (12 sts)
Round 8: *Sc in next 3 sts, inc in next st; rep from * 2 more times. (15 sts)
Round 9: Sc in each st around. (15 sts)
Round 10: *Sc in next 2 sts, inc in next st, sc in next 2 sts; rep from * 2 more times. (18 sts)
Round 11: Sc in each st around. (18 sts)
Round 12: *Sc in next 5 sts, inc in next st; rep from * 2 more times. (21 sts)
Round 13: Sc in each st around. (21 sts)
Round 14: *Sc in next 3 sts, inc in next st, sc in next 3 sts; rep from * 2 more times. (24 sts)
Round 15: Sc in each st around. (24 sts)
Change to B in the last st of Round 15.
Rounds 16–18: Sc in each st around. (24 sts)
Sl st in next st and fasten off, leaving a 6 in (15 cm) tail.
Counts at a glance
| Round | Instruction | Stitch count |
|---|---|---|
| 1 | 4 sc in MR | 4 |
| 2 | (sc 1, inc) × 2 | 6 |
| 3 | even | 6 |
| 4 | (sc 1, inc) × 3 | 9 |
| 5 | even | 9 |
| 6 | (sc 1, inc, sc 1) × 3 | 12 |
| 7 | even | 12 |
| 8 | (sc 3, inc) × 3 | 15 |
| 9 | even | 15 |
| 10 | (sc 2, inc, sc 2) × 3 | 18 |
| 11 | even | 18 |
| 12 | (sc 5, inc) × 3 | 21 |
| 13 | even | 21 |
| 14 | (sc 3, inc, sc 3) × 3 | 24 |
| 15 | even | 24 |
| 16–18 | brim, even (B) | 24 |
Finishing
- Weave in the tail at the brim on the inside.
- Pull the magic ring tail tight once more and weave it in down the inside of the tip.
- Optional: push a pinch of stuffing into the hat for a rounded shape. Hung from its tip, the hat should stay straight.
- Fold the brim up if you like the look of a turned-up cuff.
Hanging loop
Thread 10 in (25 cm) of ribbon or yarn on a yarn needle, pass it through the very tip of the hat, between two stitches of Round 1, and tie the ends together.
Stitch chart
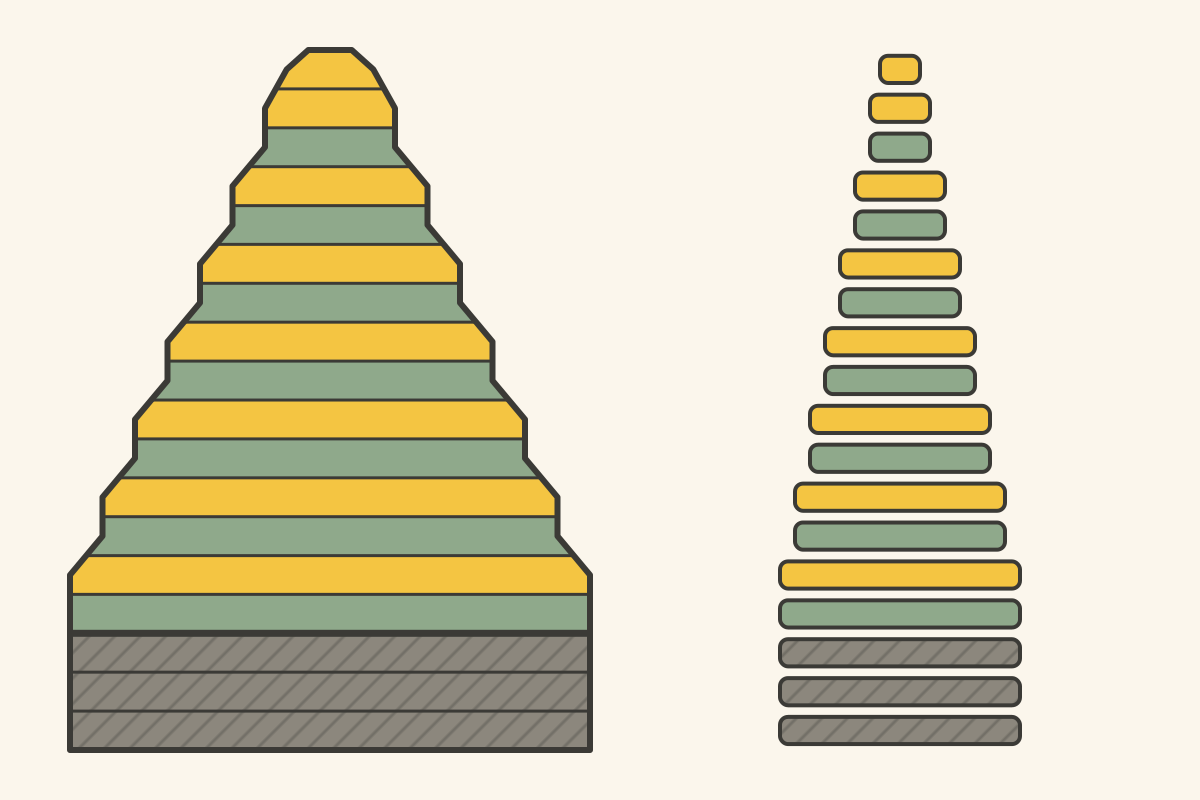
Common mistakes
- The cone is short and wide: you increased on every round. Increases go on even rounds only.
- A visible spiral ridge: the increases are stacking. Alternate the “end of repeat” and “middle of repeat” rounds as written.
- The hat twists: spiral single crochet leans slightly. That’s normal; steaming lightly or a firm brim helps it hang straight.
- Lost count in a plain round: a stitch marker in the first stitch of every round makes the rounds easy to count.
Variations
- Size: for a taller hat, keep going: Round 16 would be *sc in next 7 sts, inc in next st; rep from * 2 more times (27 sts), followed by a plain round. Then work the brim.
- Color: a green hat with a white brim makes an elf hat. A striped red-and-white body (change color every two rounds) makes a candy-cane hat.
- Stiffening: a tight single crochet cone usually stands up on its own. For a rigid hat you could use a commercial fabric stiffener. How to block and stiffen crochet compares the stiffeners and shows the steps.
FAQ
How do I add a pom-pom?
A pom-pom has to be made separately and sewn or tied to the tip. QuackStitch doesn’t cover making pom-poms yet. A small bell or bead tied on with the hanging ribbon is a quick alternative.
Can I make it in joined rounds?
Yes. Sl st to the first sc and ch 1 at the end of every round. The counts are the same, but joins leave a faint seam line down the back.
Why does the hat start with only 4 stitches?
A narrow start makes the slim, pointed tip of a Santa hat. Starting with 6 stitches gives a blunter, rounder top.
This page uses US crochet terms.