- Beginner
- about 45 min
Crochet Christmas Tree Ornament (Easy Flat Pattern)
A free, beginner-friendly flat crochet Christmas tree ornament in single crochet rows: increase every third row, add a trunk, hang it. Counts for every row.
- Skill
- Beginner
- Finished size
- Approximately 3.25 in (8 cm) wide and 4.25 in (11 cm) tall including the trunk, in worsted yarn. Size depends on yarn and tension; these are estimates, not measurements.
- Gauge
- Not critical. About 16 sc and 18 rows = 4 in (10 cm) gives roughly the size above.
Materials
- Worsted weight (medium, #4) yarn: green (A) and brown (B) — About 6 yd (5.5 m) of green and 1 yd (1 m) of brown. Estimated, not measured.
- Crochet hook — 4 mm (US G-6). Go down to 3.5 mm if your fabric looks holey.
- Yarn needle and scissors
- Ribbon or yarn for hanging — About 10 in (25 cm).
Stitches used: chain (ch) · single crochet (sc) · increase (2 stitches in one stitch) (inc) · slip stitch (sl st)
A flat Christmas tree is the easiest shaped ornament you can make: single crochet rows, one simple increase, and a little trunk at the end. It is worked from the tip down, so you can stop at any row if you want a smaller tree, and it’s a great first project for practicing stitch counts.
US/UK note: This pattern uses US terms. US single crochet (sc) is UK double crochet (dc).
Abbreviations
ch = chain · sc = single crochet (UK double crochet) · sl st = slip stitch · st(s) = stitch(es) · A = green · B = brown
Pattern notes
- The tree is worked in rows from the tip down. Turn at the end of every row.
- The ch 1 at the start of a row does not count as a stitch. Work the first sc into the first stitch.
- “2 sc in first st” and “2 sc in last st” are the increases. They make the tree one stitch wider at each edge.
- Count your stitches at the end of every row. The count is in parentheses.
Pattern
With A:
Foundation: Ch 2.
Row 1: 3 sc in 2nd ch from hook. Turn. (3 sts)
Rows 2–3: Ch 1, sc in each st across. Turn. (3 sts)
Row 4: Ch 1, 2 sc in first st, sc in each st to last st, 2 sc in last st. Turn. (5 sts)
Rows 5–6: Ch 1, sc in each st across. Turn. (5 sts)
Row 7: Ch 1, 2 sc in first st, sc in each st to last st, 2 sc in last st. Turn. (7 sts)
Rows 8–9: Ch 1, sc in each st across. Turn. (7 sts)
Row 10: Ch 1, 2 sc in first st, sc in each st to last st, 2 sc in last st. Turn. (9 sts)
Rows 11–12: Ch 1, sc in each st across. Turn. (9 sts)
Row 13: Ch 1, 2 sc in first st, sc in each st to last st, 2 sc in last st. Turn. (11 sts)
Rows 14–15: Ch 1, sc in each st across. Turn. (11 sts)
Row 16: Ch 1, 2 sc in first st, sc in each st to last st, 2 sc in last st. Turn. (13 sts)
Row 17: Ch 1, sc in each st across. Turn. (13 sts)
Trunk:
Row 18: Sl st in next 5 sts. Change to B. Ch 1, sc in next 3 sts, leave remaining 5 sts unworked. Turn. (3 sts)
Rows 19–20: Ch 1, sc in each st across. Turn. (3 sts)
Fasten off, leaving a 4 in (10 cm) tail.
Counts at a glance
| Rows | What happens | Stitch count |
|---|---|---|
| 1 | 3 sc at the tip | 3 |
| 2–3 | even | 3 |
| 4 | +1 at each end | 5 |
| 5–6 | even | 5 |
| 7 | +1 at each end | 7 |
| 8–9 | even | 7 |
| 10 | +1 at each end | 9 |
| 11–12 | even | 9 |
| 13 | +1 at each end | 11 |
| 14–15 | even | 11 |
| 16 | +1 at each end | 13 |
| 17 | even | 13 |
| 18 | trunk on the center 3 sts | 3 |
| 19–20 | even | 3 |
The rhythm is simple: one increase row, then two plain rows.
Hanging loop
Thread 10 in (25 cm) of ribbon or yarn on a yarn needle, pass it under both loops of the middle stitch of Row 1 (the tip) and tie the ends together. A ribbon in red or gold doubles as the tree topper.
Finishing
- Weave in the ends: the green tail at the tip and the green and brown tails at the trunk. Weave each along the edge of its own color so it doesn’t show through.
- Lay the tree flat. If the edges curl, pin it flat, mist it with water and let it dry.
Stitch chart
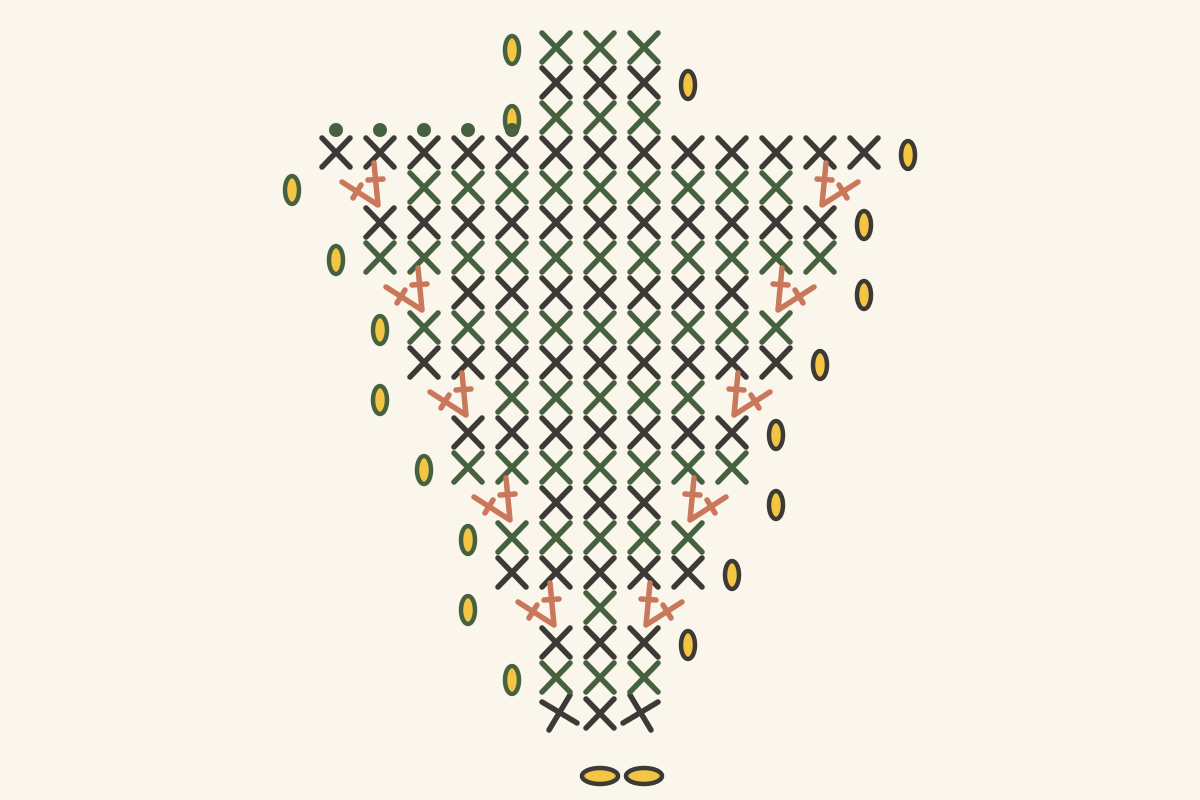
Chart key
- chain (ch)
- slip stitch (sl st) — UK: slip stitch (ss)
- single crochet (sc) — UK: double crochet (dc)
- increase (2 stitches in one stitch) (inc)
Rows are read from the foundation chain up: odd rows right to left, even rows left to right.
Common mistakes
- The tree leans to one side: you added an increase at only one edge. Each increase row gains exactly 2 stitches.
- The edges are wobbly: you worked into the turning chain. The ch 1 is never a stitch, so the first sc goes into the first real stitch.
- The trunk is off-center: recount Row 17 (13 sts), then sl st across exactly 5, work 3 sc and leave 5.
- Stitches gained or lost on plain rows: the last stitch of a row is easy to miss. Count every row.
Variations
- Size: for a taller tree, keep the rhythm going instead of starting the trunk: work Row 18 plain (13 sts), increase on Row 19 (15 sts) and work Rows 20–21 plain. Then make the trunk on the center 3 sts (6 sl st, 3 sc, 6 left).
- Color: change to a new color at the start of any increase row for a striped “garland” tree. You can also make the trunk in the same color as the tree.
- Stiffening: single crochet in worsted yarn is fairly stiff on its own. To make a stiff tree that stands up, you could use a commercial fabric stiffener. How to block and stiffen crochet compares the stiffeners and shows the steps.
FAQ
Can I make a whole set from one ball of yarn?
Yes. Each tree uses only a few yards, so one 100 g ball of worsted yarn makes many trees.
Why start with 3 sc instead of 1?
Three stitches in one chain give a neat, slightly rounded tip that is easy to work into on Row 2. A single stitch is hard to find and tends to twist.
How do I make the edges smoother?
Work a round of single crochet around the whole tree in a contrasting color. That isn’t part of this pattern’s counts, so take your time at the corners.
This page uses US crochet terms.